|
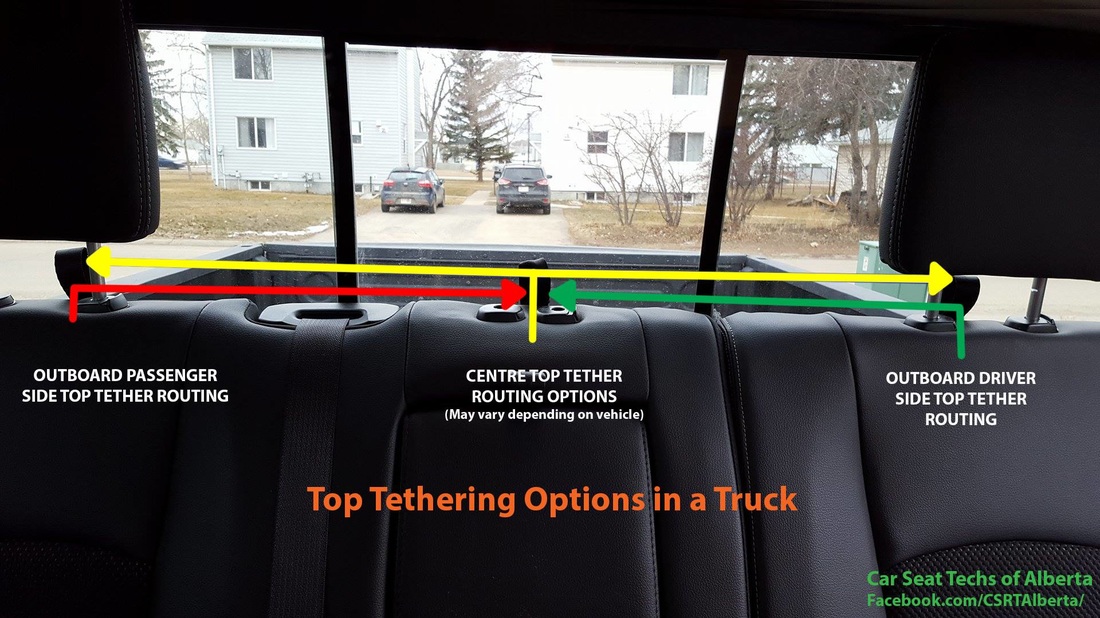
While living in Alberta, you see trucks all over the place. It almost seems like there are MORE trucks than any other vehicle on the road, and it almost seems like you must own a truck to become a true Albertan, LOL. Well, I guess we decided we wanted to be a "true Albertan" because we bought a truck for the first time in 2013. The first thing I noticed in my truck, was that the top tethering of a forward-facing car seat wasn't what I was used to seeing. I have done many forward-facing installs in vans, cars and SUVs, but I had never done a forward-facing install in a truck, and seeing as trucks are so popular here, I'm still a little surprised at that. It was very different, so different that I had no idea what I was supposed to do at first. So I grabbed the vehicle owner's manual (something everyone should look through when installing any car seat in their vehicle) and flipped to the "Child Restraint" section and read up on the top tether requirements. Turns out I was correct, it IS a very different routing procedure. Not super hard or difficult, just different. Now not every truck has the same way to route the top tether, it varies from truck to truck and even between cab sizes or vehicle models. This is why its EXTREMELY important to double check your own vehicle owner’s manual to find out exactly how to top tether your forward-facing car seat in your truck. The top tether loops may look different from vehicle to vehicle, some may be a single webbing loop or other may be a wire wrapped loop, or have a loop with a metal washer type thing inside it, or it may have a webbing loop with a solid metal bar behind it. No matter how yours looks, they all work relatively the same way. To top tether in a truck with this type of top tethering it's fairly simple once you know what you are doing. So basically how this works is you place the car seat on the spot where you want to install it, and then take the top tether and feed it under the headrest and then though the loop, than you feed the top tether across the back of the seat and attach it to the fabric loop/metal washer/metal bar that is adjacent to the seat the car seat is being installed on. Note: If you are installed in the middle location, some truck are very specific on where you must attach the top tether hook too, so again check your manual for vehicle specific details. Now install your seat, once your seat is installed correctly, you than tighten up the top tether. It doesn't need to be super tight, just nice and snug. When installing 2 or 3 car seat in a truck, it is doable, and its the only time you can attach more than one tether hook to an anchor point. So if you have 2 seats installed on the outboard (by the doors) positions, you would thread the top tethers the same way, and have them both attached to the center top tether anchor. If your anchor point is a loop or the metal washer you will want to evenly tighten the top tethers so that they are equal. Now if you add a 3rd car seat to the mix, you'll do the same thing as above, and thread the top tether through the center loop and attached it to one of the outboard loops, you'll want to tighten up the outboard seats first, again making sure to they are tightened equally on the middle loop, and then tighten up the middle one. The picture below shows how this would work. Here is a video I made to help show how top tethering in a truck is done. Sometimes its easier to understand when you can visually see how its done.
2 Comments
Rachel
3/29/2019 08:38:34 pm
We have a retrofit from Ford for our older crew cab F250. We installed the tether straps as directed but the problem is that we can't get our tether strap on the car seat to go through the loop to connect to the other... We don't know how to fix this and hate trying to drive without a tether connected. Any suggestions? I've been looking at other carseats but the buckles all seem too close to the hook to get it through the tether loop.
Reply
Hi Rachael,
Reply
Leave a Reply. |
ArchivesCategories |


 RSS Feed